
Development Deep Dive: Gaari
Welcome to Development Deep Dive, a new part of my blog where we'll be taking a look at the development of Gaari's products, services and an overall state of the company. Today, I'll be taking you through the most important aspect of Gaari, Core , authentication and database connections. This will be very long, so sit tight!
Let's get started!
Core
Core is Gaari's backend, which is under heavy development and provides functions and handles for all of Gaari's services. It's the center of everything Gaari, from authentication to settings to uploading materials.
We want to be able to dynamically import functions like this:
import Core from "@/core"

const {
    name,
    lastName,
    fetchUserData,
    checkUserAuthentication,
} = Core();
Avatar Example with Core
Heres a high-level overview of what we want to achieve for a function of handling avatar changes:
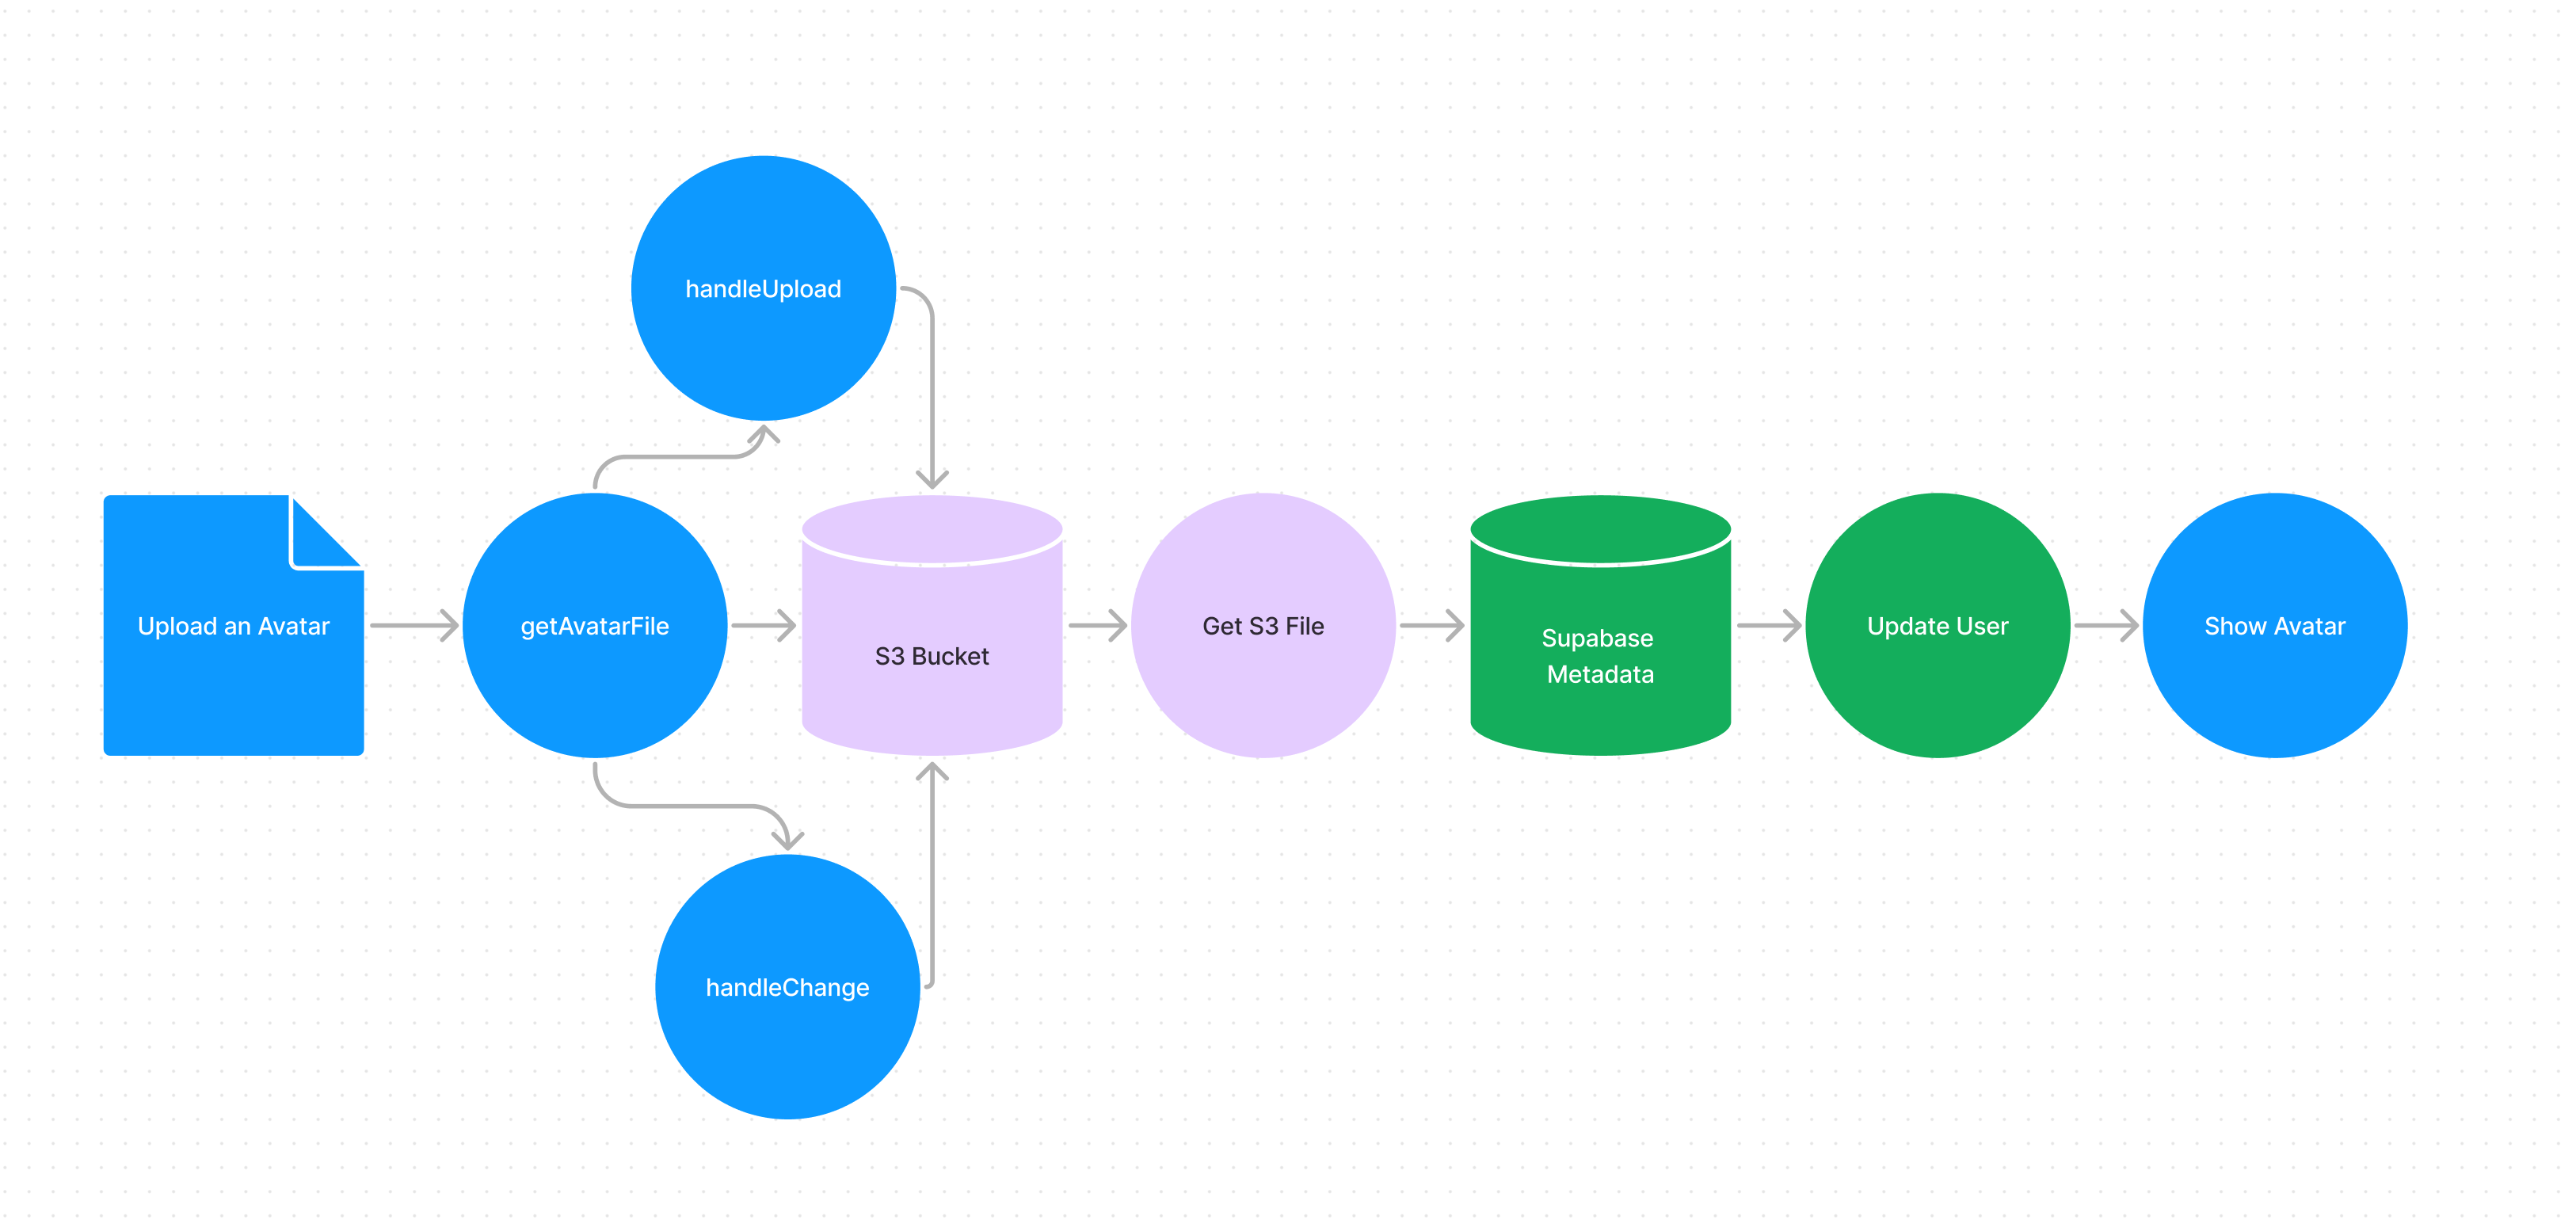
Core uses AWS, Supabase and API requests to handle functions. Let's look at an example:
import AWS from "aws-sdk";
import {useEffect, useState} from "react";
import {supabase} from "@/utils/supabase";
import {toast} from "react-toastify";

const s3 = new AWS.S3({
        credentials: {
            accessKeyId: process.env.AWS_SECRET_KEY,
            secretAccessKey: process.env.AWS_ACCESS_KEY,
        },
        region: 'us-west-2',
    });

const [avatar, setAvatar] = useState('');
const [avatarFile, setAvatarFile] = useState(null);

const handleAvatarChange = (e) => {
        const file = e.target.files[0];
        setAvatarFile(file);
        setSelectedFileName(file.name);
    };

    const handleUploadAvatar = async () => {
        if (!avatarFile) return;

        const fileExt = avatarFile.name.split('.').pop();
        const fileName = `${Math.random().toString(36).substr(2, 9)}.${fileExt}`;

        try {

            const params = {
                Bucket: 'gaari',
                Key: `avatars/${fileName}`,
                Body: avatarFile,
                ACL: 'public-read',
            };

            await s3.upload(params).promise();

            const avatarURL = `https://gaari.s3.us-west-2.amazonaws.com/avatars/${fileName}`;
            setAvatar(avatarURL);
            await supabase.auth.updateUser({
                data: { avatar: avatarURL },
            });
            toast.success('Avatar successfully uploaded!');
        } catch (error) {
            console.error('Error uploading avatar: ', error.message);
            toast.error('There was an issue uploading your avatar.', error.message);
        }
    };
    return {
        handleAvatarChange,
        handleUploadAvatar,
        avatar
    };

// Misaligned code, so it wont work but for demo purposes
To the beginner level developer, this just looks like the hardest thing in the world, so lets break each line into an explanation to fully understand the concepts behind
our new functions handleAvatarChange, handleUploadAvatar and our useState variable avatar (which we'll talk about as well).
To start, we have to import our services such as Supabase and AWS. We also have imported useEffect and useState from React for variables. Toastify is a React component that brings notifications adaptively. Inspired by Katanemo's login method too!
import AWS from "aws-sdk";
import {useEffect, useState} from "react";
import {supabase} from "@/utils/supabase";
import {toast} from "react-toastify";
Next, we intialize the S3 (S3 is AWS file hosting) creation by specifying a variable with const and making it equal to a new S3 instance, as seen below.
const s3 = new AWS.S3({
        credentials: {
            accessKeyId: process.env.AWS_SECRET_KEY,
            secretAccessKey: process.env.AWS_ACCESS_KEY,
        },
        region: 'us-west-2',
    });
Note: Because API keys are confidential, we use a .env file (a file that is ignored on GitHub to protect sensitive information) to securely provide keys. Displaying keys is not recommended as anyone can aceess our information if public. You also have to import via: import dotenv from "dotenv"
Before we go any further, I'd like to show you our current form layout that utilizes these functions, as well as some others that I havent shown today.
<form className="py-5" onSubmit={handleAvatarUpload}>
          <div className="mt-5">
            <label htmlFor="avatar" className="block text-sm font-medium leading-6 text-white">
              Avatar Upload (Optional)
            </label>
            <label htmlFor="avatar" className="block w-full mt-1 rounded-md border-2 border-indigo-600 py-2 px-4 bg-indigo-600 text-white text-center cursor-pointer hover:bg-indigo-700">
              Choose Avatar
            </label>
            <span className="block mt-2 text-white text-sm">{selectedFileName}</span>
            <input
                id="avatar"
                name="avatar"
                type="file"
                accept="image/*"
                onChange={handleAvatarChange}
                className="hidden"
            />
          </div>
          <div className="grid-cols-2 justify-center flex gap-x-3">
            {avatarFile && (
                <button
                    onClick={handleUploadAvatar}
                    className="mt-4 inline-flex justify-center py-2 px-4 border border-transparent shadow-sm text-sm font-medium rounded-md text-white bg-indigo-600 hover:bg-indigo-700 focus:outline-none focus:ring-2 focus:ring-offset-2 focus:ring-indigo-500"
                >
                  Upload Avatar
                </button>
            )}
            {/* Add the Delete Avatar button */}
            <button
                onClick={handleDeleteAvatar}
                className="mt-4 inline-flex justify-center py-2 px-4 border border-transparent shadow-sm text-sm font-medium rounded-md text-white bg-red-600 hover:bg-red-700 focus:outline-none focus:ring-2 focus:ring-offset-2 focus:ring-red-500"
            >
              Delete Avatar
            </button>
          </div>
        </form>
These should be pretty self explanatory and I won't go in depth into these, however if you'd like to learn more, we'll be creating a UI based update on our company website soon!
Back to Core however, we'll start by creating 3 things:
avatar,setAvatarconstantsavatarFile,setAvatarFileconstantshandleAvatarChangefunction (which is also a const since we export it thru a hook)
const [avatar, setAvatar] = useState('');
const [avatarFile, setAvatarFile] = useState(null);

const handleAvatarChange = (e) => {
        const file = e.target.files[0];
        setAvatarFile(file);
        setSelectedFileName(file.name);
    };
We created the variable file to store the file temporarily, then we use setAvatarFile(file); to store the file into setAvatar to use later on. We also store the file.name locally to show the user which file they selected.
Now the fun stuff, the actual uploading the avatar itself. We'll go line by line explaning what each of the code does, then I'll show you an example of the process that happens.
const handleUploadAvatar = async () => {
        if (!avatarFile) return;

        const fileExt = avatarFile.name.split('.').pop();
        const fileName = `${Math.random().toString(36).substr(2, 9)}.${fileExt}`;

        try {

            const params = {
                Bucket: 'gaari',
                Key: `avatars/${fileName}`,
                Body: avatarFile,
                ACL: 'public-read',
            };

            await s3.upload(params).promise();

            const avatarURL = `https://gaari.s3.us-west-2.amazonaws.com/avatars/${fileName}`;
            setAvatar(avatarURL);
            await supabase.auth.updateUser({
                data: { avatar: avatarURL },
            });
            toast.success('Avatar successfully uploaded!');
        } catch (error) {
            console.error('Error uploading avatar: ', error.message);
            toast.error('There was an issue uploading your avatar.', error.message);
        }
    };
This is a function, when we call the function via a button it will do everything inside it.
First we make sure if an avatar file exists by (!avatarFile). The "!" is often used as a logical NOT operator. It's used to negate the value of a boolean expression. When you place an exclamation mark before a value or expression, it will return the opposite boolean value. For example:
let isTrue = true;
let isFalse = !isTrue; // isFalse will be false
Next, we'll create 2 variables to start a letter randomization process to ensure security and avoiding
duplicate files, we'll use Math.random, an integrated JavaScript feature.
const fileExt = avatarFile.name.split('.').pop();
const fileName = `${Math.random().toString(36).substr(2, 9)}.${fileExt}`;
Now we'll create file parameters and options for our S3 bucket.
const params =
    {
        Bucket: 'gaari',
        Key: `avatars/${fileName}`,
        Body: avatarFile,
        ACL: 'public-read',
    };

await s3.upload(params).promise();
What each parameter does:
Bucket: specify the AWS S3 bucket, or storage space, to put the file inKey: where to put the file specifically, so we created anavatarsfolder to organize itBody: what we are putting, so ouravatarFilein which we usedsetAvatarFilebefore itACL: access control list properties, which will let us read the URL publicly anywhere
Then we'll authorize the upload process via s3.upload(params).
Now we can create the avatar for our authenticated user. We'll create a variable called avatarURL to store our URL dynamically (with the {fileName} tag to change automatically).
const avatarURL = `https://gaari.s3.us-west-2.amazonaws.com/avatars/${fileName}`;
setAvatar(avatarURL);
await supabase.auth.updateUser({
    data: { avatar: avatarURL },
});
toast.success('Avatar successfully uploaded!');
We'll setAvatar value to the newly constructed constant, and request authentication from Supabase to update the user with the avatarURL to update the users metadata. After success, we'll give them a nice notification to let them know of changes.
However if an error occurs, which is commonly found when running on development servers, we can console.log the error message so we can see the problem:
} catch (error) {
    console.error('Error uploading avatar: ', error.message);
    toast.error('There was an issue uploading your avatar.', error.message);
}
Note, I setup the avatar parameters for when you signup for Gaari's service as null. That way you can optionally upload. We'll talk about that in the Authentication section of this article.
So that's a glimpse of Core, a Gaari backend handler which will be available on GitHub soon.
Authentication and Users
Authenticating a user and verifying its session is crucial to building an application where everything is profile-tailored. We need to make sure users passwords are encrypted, have valid sessions and have the right permissions to change records of vehicles (we'll also talk about this in this article) to their own.
This all seems like a difficult task, but with Supabase Authentication, it makes building authentication much faster.
Let's take a look of the signUp and logIn processes:
Signup
Signing up for our service only requires 3 fields, and 2 optional fields.
const handleSignup = async (e) => {
        e.preventDefault();
        if (password !== confirmPassword) {
            toast.error("Passwords do not match!");
            return;
        }

        try {
            // @ts-ignore
            const { data, error } = await supabase.auth.signUp({
                email,
                password,
                options: {
                    data: {
                        first_name: `${name}`,
                        last_name: ``,
                        avatar: ``,
                    }
                }
            });

            if (error) {
                alert(error.message);
            } else {
                // User created successfully
                toast.success("Signup successful!");
                await router.push("/verify-email");
            }
        } catch (error) {
            toast.error("An error occurred during signup. Please try again.");
        }
    }
Our current signup page:
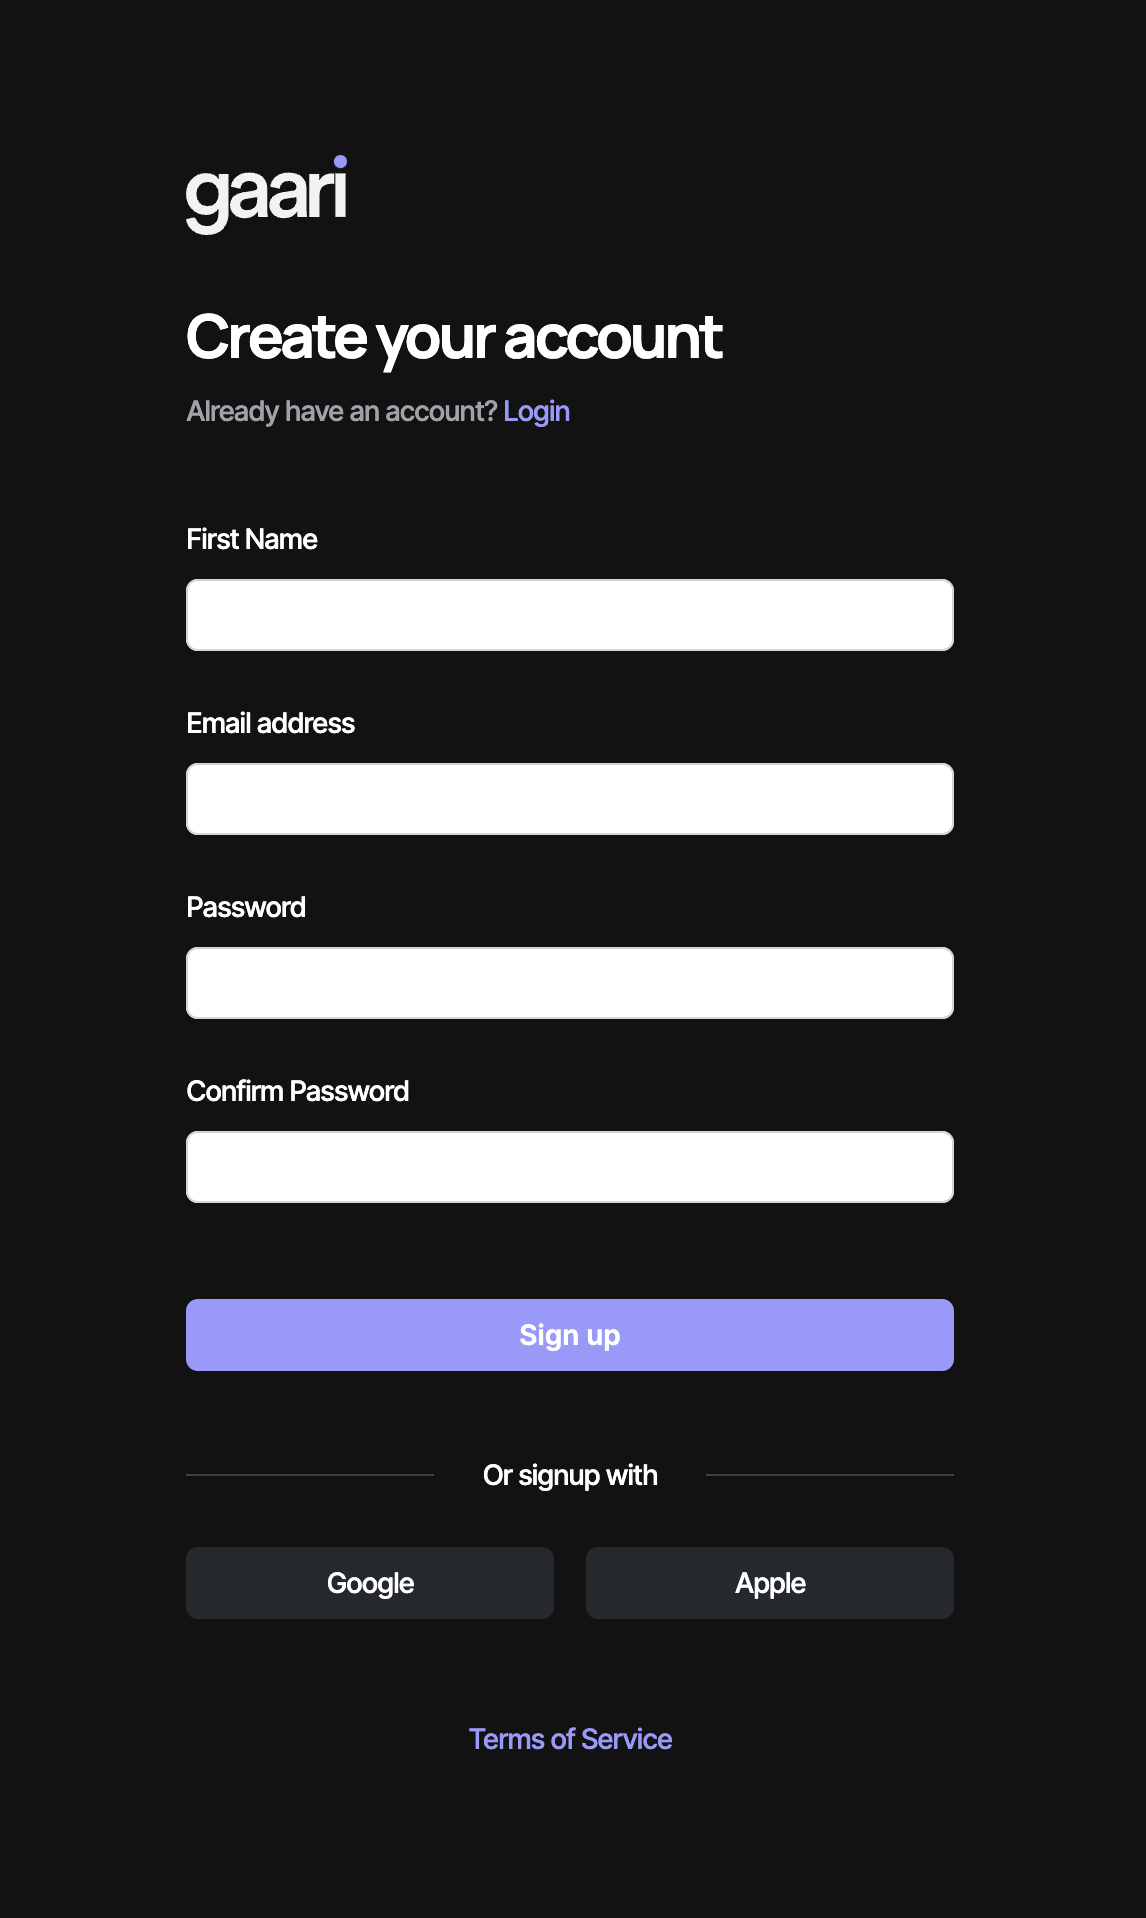
This is the handleSignup function. When clicked it triggers the following tasks:
- First we need to check if the confirm password and password have the same fields when signing up
- Retrieve the
emailandpasswordfrom the form - Retrieve the
first_namefrom the form - Set
last_nameandavatarand empty because these are optional, and can be changed in settings
All of this can be done with Supabase's JavaScript SDK that we imported in Core, using supabase.auth.signUp() this time.
If all else is verified, we can success the signup and send them to a page called /verify-email to tell them
to verify or else they cant access anything. And then if an error occurs, we can catch it and show it.
Login
Same principles as signing up, we can use supabase.auth.signIn(), however we need
to specify our method, so it would be supabase.auth.signInWithPassword(), and we can pass details as needed.
const handleLogin = async (e) => {
        e.preventDefault();

        try {
            const { data, error } = await supabase.auth.signInWithPassword({
                email,
                password,
            });

            if (error) {
                toast.error("Incorrect email or password. Please try again.");
            } else {
                // User logged in successfully
                toast.success("Welcome back!");
                router.push("/dashboard");
            }
        } catch (error) {
            toast.error("An error occurred during login. Please try again.");
        }
    }
After success, it will bring you to the dashboard. If an error occurs, we'll show you a notification.
Database and Storage
Now that we've figured out authentication and our handler, Core, we can focus on retriveing user-specific requests, that are only authorized to their
own user_id, generated by Supabase.
Our application will provide you a dashboard where you can add your own vehicles, and it's a very rough sketch but the functionality is there.
Let's take a look at it:
First, we need to create a table in Supabase, and we'll do that using SQL (supabase uses postgres).
CREATE TABLE vehicles (
  id SERIAL PRIMARY KEY,
  user_id UUID REFERENCES auth.users NOT NULL,
  make TEXT NOT NULL,
  model TEXT NOT NULL,
  year INTEGER NOT NULL,
  vin TEXT
);
Pretty self explanatory, only thing is that we want our user_id to be matched with authenticated users user_id, s
o only they can add, change or delete their vehicle rows. Also, our VIN is optional so no need to add NOT NULL.
Once our table is created, we start backend functions with a file called addVehicle.tsx (we'll be migrating this code to Core soon).
const AddVehicleForm: React.FC<AddVehicleFormProps> = ({ userId }) => {
    const [make, setMake] = useState<string>('');
    const [model, setModel] = useState<string>('');
    const [year, setYear] = useState<string>('');
    const [vin, setVin] = useState<string>('');

    const handleSubmit = async (e: React.FormEvent) => {
        e.preventDefault();

        try {
            const { data, error } = await supabase
                .from('vehicles')
                .insert([
                    { user_id: userId, make, model, year: parseInt(year), vin },
                ]);

            if (error) {
                throw new Error('Error saving vehicle data', error.message);
            }

            setMake('');
            setModel('');
            setYear('');
            setVin('');

            toast.success('Vehicle added successfully!');
        } catch (error) {
            console.error('Error adding vehicle:', error.message);
            toast.error('Error adding vehicle');
        }
    };
So let's breakdown what's happening here:
- Create constants with
useStateto dynamically change the values as needed - We've passed a
(e: React.FormEvent)to be compatible with forms
Now we need to authenticate with Supabase and retrieve our table:
const { data, error } = await supabase
    .from('vehicles')
    .insert([
        { user_id: userId, make, model, year: parseInt(year), vin },
    ]);

    if (error) {
        throw new Error('Error saving vehicle data', error.message);
    }
We'll connect from supabase and request .from('vehicle') table, and we'll insert the data in. If it fails, throw an error.
After that clears, we can clear the useState constants to create new entries.
setMake('');
setModel('');
setYear('');
setVin('');
Now we need to authenticate the user to it's own user_id:
This is VehicleDashboard.tsx, a React component that we can import.
import { useState, useEffect } from 'react';
import { supabase } from '@/utils/supabase';
import AddVehicleForm from '@/utils/addVehicle';

interface Vehicle {
    id: number;
    user_id: string;
    make: string;
    model: string;
    year: number;
    vin?: string;
}

interface VehicleDashboardProps {
    userId: string;
}

const VehicleDashboard: React.FC<VehicleDashboardProps> = ({ userId }) => {
    const [vehicles, setVehicles] = useState<Vehicle[]>([]);

    useEffect(() => {
        const fetchVehicles = async () => {
            try {
                const { data, error } = await supabase
                    .from<Vehicle>('vehicles')
                    .select('*')
                    .eq('user_id', userId);

                if (error) {
                    console.error('Error fetching vehicles:', error.message);
                } else {
                    setVehicles(data || []);
                }
            } catch (error) {
                console.error('Error fetching vehicles:', error.message);
            }
        };

        fetchVehicles();
    }, [userId]);

    return (
        <div>
            <h2 className="text-2xl font-bold text-white mt-8 mb-4">My Vehicles</h2>
            {vehicles.length === 0 ? (
                <p className="text-gray-500">No vehicles added yet.</p>
            ) : (
                <ul className="mt-4 space-y-2">
                    {vehicles.map((vehicle) => (
                        <li key={vehicle.id}>
                            <button className="text-[#9999FF] text-3xl font-medium" disabled>
                                {vehicle.year} {vehicle.make} {vehicle.model}
                            </button>
                            {/* Implement the popup with vehicle information and image upload later*/}
                        </li>
                    ))}
                </ul>
            )}
            <AddVehicleForm userId={userId} />
        </div>
    );
};

export default VehicleDashboard;
We can use a useEffect state in our React component to run our function on effect. We can select databases with SQL query like syntax to locate
and match user_id. Very useful tools from Supabase! Then at the bottom, using TailwindCSS we can display the vehicles via mapping.
At the very bottom, we'll add our AddVehicleForm with a property of userId={userID} to authenticate.
Lots of authentication.
And then when we are finally done, we can add the component like this:
<VehicleDashboard userId={userId} />
But, we actually aren't done yet because we haven't retrieved the ID from anywhere.
useEffect(() => {
    const fetchUserId = async () => {
        const { data } = await supabase.auth.getUser()
        if (data?.user?.id) {
            setUserId(data.user.id)
            }
        }
        fetchUserId()
}, [])
Using useEffect again, we can create another function in where we fetchUserId via Supabase Authentication (supabase.auth.getUser()). If the data matches, and the user matches, then retrieve the id and store it in setUserID.
This function will also soon be migrated to Core.
Final Thoughts
This has been a roller coaster of an article, and I hope you stayed to read almost all of it, I made all this under one night because I was excited to publish it. Nevertheless, there could be errors and my apologizes for that. That said, thanks for reading this indepth development update about Gaari's new Core service, authentication handling and database connections.
Gaari is hiring! If you'd like to help out, please do email me at musa@spherrrical.dev. If you'd like to chat more about Gaari or just development in general you can also text me @ (425)-236-0563. I look forward to your comments!
I am also open to jobs, internships or just job shadowing, please reach out if you are hiring managers!
End of article!